How to floss: Essential tips for oral hygiene
Help keep pearly whites in tip-top shape with these tips and tricks for effective flossing.

No, this article isn’t about the flossing dance move. It’s about oral hygiene! So rather than swaying your hips and swinging your arms back and forth (though please do so if you feel inspired), grab that piece of string and let’s dive in.
A frequently cited Harris Poll survey conducted in 2015 found that more than one-quarter of Americans lie to their dentists about flossing — and 36% said they’d rather clean a toilet, do their taxes or do other unpleasant chores than floss daily.1,2
We totally get it. But hear us out: Regularly flossing can help lower the occurrence of gum disease,3 which can lead to pain — sometimes severe — and psychological issues, such as anxiety, embarrassment and reduced participation in social activities.4
Read on for more benefits of flossing and tips for how to floss properly.
In this article:
Benefits of flossing
If you’re regularly brushing your teeth, flossing may seem redundant. But it can actually reach debris and plaque that your toothbrush can’t.5 Because of this, it is recommended that you floss once per day as a part of your regular oral care routine.6
“Every time we eat, bacteria and food gets stuck between our teeth, and the only way to remove it is to floss,” says Irina Kessler, DDS, a cosmetic dentist at New York Family Dental Arts in New York City.7 “Simply brushing could leave behind food, cause bad breath and, if untreated, lead to periodontitis,8 which is a serious gum infection that damages the soft tissue around teeth.”
More than 40% of adults report having felt pain in their mouth within the last year, and more than 80% of people will have had at least one cavity by age 34.9 And it not only affects your teeth but may also lead to other health issues, including heart disease, certain types of cancer and even the progression of Alzheimer’s.10,11 As such, gum disease has been recognized as a public health concern — and if simply adding flossing to your at-home routine12 could help lessen your chances of developing it, why not start now?
Even if you’re already a dedicated flosser, meeting with your dentist is always a good idea to help assess your current gum health. They can also advise how often you should be in their chair (likely once or twice a year)13 and what you can do in between visits to keep your teeth and gums healthy. Some of their recommendations may include specific types of toothpaste, floss and oral rinses.
Preparing for flossing
Before you can floss, you’ll need to choose the right kind of floss to ensure your routine is as successful as possible.
There are multiple dental floss products available, including floss picks, threaded floss and water flossers. Threaded floss is a long string wound up in a small container with a metal cutter to help break the floss into pieces when you want to use it. Floss picks, on the other hand, contain a small piece of taut string between two plastic prongs with a small handle. Unlike a roll of thread floss, you use these once and then throw them away.
Floss picks may be more convenient in certain situations, but Dr. Kessler notes they can be limiting in their motion compared to threaded floss.
“Threaded floss can hug and glide along your tooth structure, causing the best results,” she says. “I recommend Cocofloss because of its fiber consistency. The floss is also typically coated with a thin layer of microcrystalline wax, which makes using it more comfortable.”
Lastly, water flossers generally have a thin tip attached to a battery-powered base and — as you may have guessed — shoot a jet of water at your teeth and gums to target plaque and debris. To use it, just aim at the gaps between your teeth and push the “on” button.
Now that you know all about the proper tools, it’s time to floss. But first, wash your hands and ensure you’re using a new, clean piece of floss: Both will help limit the introduction into and/or the spread of bacteria in your mouth.14
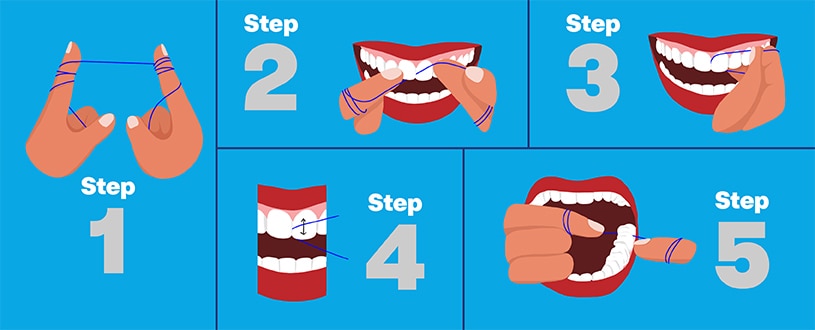
How to floss properly
Ready to floss it up? Follow these steps:15,16
- For thread floss, it’s recommended to use a piece roughly 18 inches in length, with the ends wrapped around your pointer fingers to help keep it taut.17 Tip: Have two inches or so worth of thread in between your fingers. If the thread between your fingers is too long, you’ll have trouble getting it inside your mouth.18
- Gently slide the floss between two of your teeth, reaching where your teeth meet your gum line.
- Then curve the floss like a C around the chosen tooth.
- Gently move the floss up and down, creating a rubbing motion so that it connects with the papilla (the triangular gum area between your teeth).
- Slide the floss out and do the same thing on the next set of teeth, working your way around your entire mouth.
For those with dental crowns or implants, Dr. Kessler explains that you can still floss normally, because it won’t cause them to come loose. “Avoiding crowns and implants could cause cavities underneath, causing you to get replacements,” she says.
Common mistakes to avoid
When you first begin flossing — especially if your dentist has discovered gingivitis — you may notice some bleeding. This could either be a sign you are flossing too hard or that you have bacteria present.19 If your gums bleed regularly, you should see your dentist to evaluate the cause and get advice for flossing properly. If all is well, you may just need to use a gentler rubbing motion and make sure you aren’t too rough on your gum line.
“Proper flossing will eliminate the bacteria that cause bleeding, which is why we emphasize it in our office,” adds Dr. Kessler.
Another vital part of flossing is knowing when to floss. The jury is still out on whether you should floss before or after you brush your teeth,20 but many experts agree that it doesn’t really matter as long as you do it at least once within 24 hours.21
However, Dr. Kessler explains that flossing before brushing22 “will remove the food or bacteria that’s stuck, and then brushing can coat the clean area and aid in the protection of your teeth.”
She recommends doing this routine before bed to remove bacteria that is more likely to grow, as your saliva decreases while you sleep. Of course, you can also floss any time of the day if you see large pieces of food stuck between your teeth.
Tips for effective flossing
First and foremost, you should always combine your at-home oral routine with regular visits to your dentist. If they notice any signs of gum disease, they can recommend a treatment plan. If you still have concerns about your flossing technique, you can also ask them for a demonstration.
Another great tip: Floss while looking in a mirror. This will provide a clear view of your mouth, allowing you to target your teeth and gums properly. Then why not follow up with some mouthwash to really bring that clean, healthy mouth to the next level?
This content is for informational purposes only and is not medical advice. Consult your health care provider before taking any vitamins or supplements and prior to beginning or changing any health care practices.
-
-
-
-
-
-
-
7Irina Kessler, interview, August 2023
-
-
-
-
-
-
-
-
-
16Irina Kessler, interview, August 2023
-
-
-
-
-
-